Pages

Monday, April 30, 2012

The Cheapo Cheapens Challenge: Week 1 and Week 2


I go in phases of how successfully I save my money. I still have been doing well but I could tighten the proverbial belt another couple of notches. My steady employment will be ending in the middle of June and I do not know what I will be doing after that. As this has been the case the few previous years, I want to be even better at saving my money. I have a few goals I want to reach:
  • contribute more to my home
  • travel more and take Z. on a trip (he's taken me on tons of trips, it's my turn)
  • eventually buy a new car; while I have a down-payment saved I do not want the monthly payment to be a burden
  • I pay for my own health insurance out-of-pocket and this is fine and I am happy with my coverage but I would like to add dental to my policy and this is extra. 
  • buy my own violin. This is a more long-term goal (I am imagining sometime in 2013) and I have been setting aside a portion of money earned from teaching music lessons to help cover this but it is slow going.

I have gone through phases of being really frugal but then I get burnt out. There are lots of great frugal living websites and blogs out there with plenty of tips and suggestions (including my own!). But they do not address the challenge of living day-to-day frugally. I am going to share the process of becoming even more frugal for two reasons. The first is I want to share this information. I read all these posts and the authors make it sound so easy: just don't spend your money, find ways to make some, and when you do spend your money make sure it is as little as possible and it's great.

Well, I find it a little more challenging than that; hence, the phases of commendable frugality contrasted with the periods of slightly looser purse strings. I am sure I am not the only one who struggles.

I also thought by chronicling my frugal journey I might be better about sticking to the plan. I have no idea how long this will last but let's see.

Week 1: April 15 - April 21
Week 2: April 22 - April 28


One place where Z. and I could save more money was by eating out less. For a very long time we were very good about eating out as a treat and it was a special occasion. The last few months, eating out has become more normal. So, eating out is once again relegated to a treat. We did eat out once during this week but that was planned and purposeful.

Saturday and Sunday of that week we made a point to buy all our groceries. Normally, we pick up a couple items here and there throughout the week. This is where I get in trouble. If you are only spending a couple of dollars at a time, it is easy to lose track of what you are really spending.

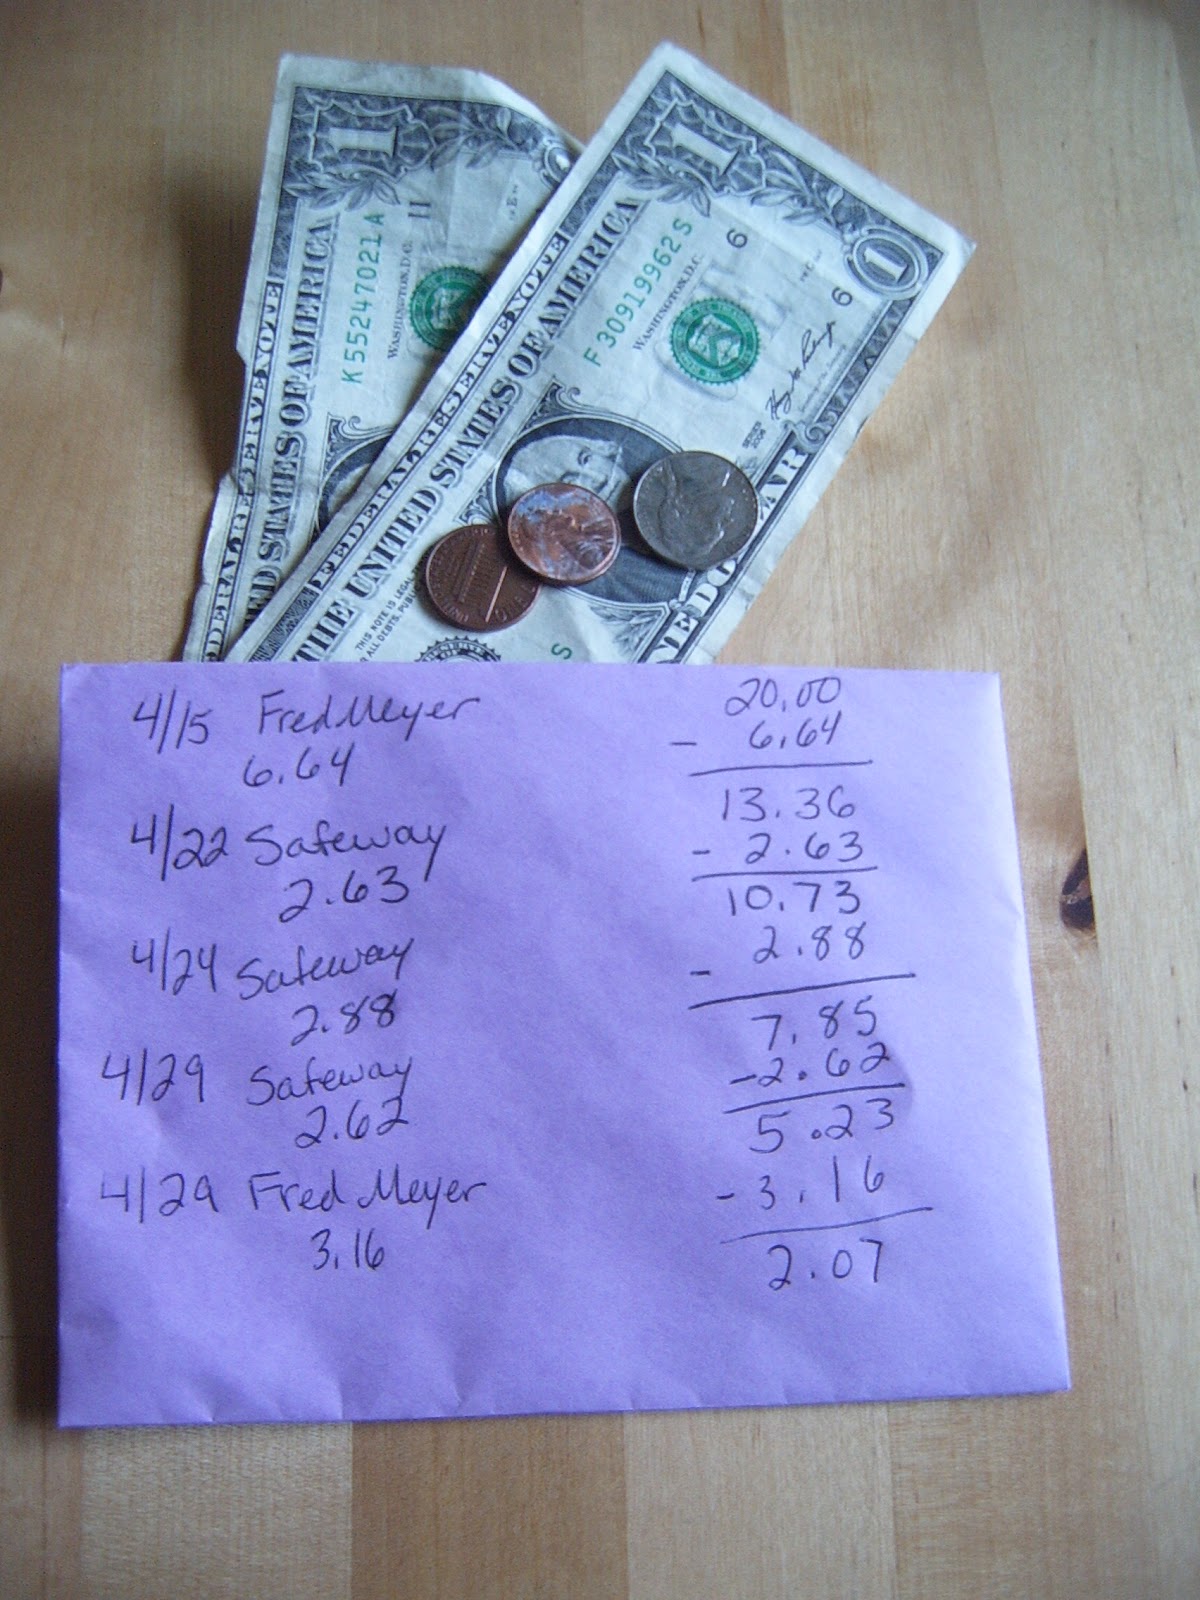
To help me combat this, I have a plan for myself. I am starting off with an envelope, this format or form of record keeping may evolve as we go along, that has my grocery money. I began with $20 and an intention of making it last two weeks (Z. and I split the cost of groceries by each paying for some of them or paying for the items that only one of us eats). I accidentally made a point of keeping the envelope where I would see it frequently. I had recurring reminders of how much money I had spent and how much I had left. When I saw the money spent, I would think about where that money had gone. I think this was very helpful in impulse control and I think I will explore this topic further.

My $20 did not include eating out or what I spent at the farmer's market. Nor, did the envelope take into account the money spent at Costco over that first weekend. I have to take baby steps or I will not follow through for very long. That is one of the biggest lessons I have learned from my previous falls from cheapdom: baby steps are key.


So, it is now April 30th and I have $2.07. I exceeded my goal! What is left will be added to another $20 which will have to last until May 13th. My money went towards:
  • 8 cans of beans for $4 (thank you Fred Meyer for finally having beans back on sale) and no I did not eat that much in two weeks; they are sitting quietly in the pantry
  • a bunch of junk food (Cheetos - it was a present to myself and they were cheap because of coupons, M & Ms - for Z.'s lunches and to bribe my students with and I used coupons, and 2 doughnuts to share with Z. yesterday morning)
  • lots of produce (carrots, onions, cabbage, tomatoes, and some special fruits and veggies I used to make some recipes for the blog)
  • and other essentials like half-and-half for coffee.
Why this money went this far:
  • I really wanted to buy a gallon of milk but just never did. That would be close to $3.
  • We bought two loaves of bread at the Costco at the beginning of this Operation (which was not a part of this budget). And, Z. bought a loaf of bread yesterday. 
I think over the course of a couple months, these types of purchases will even out. 

I still have to figure out how to budget farmer's market, eating out, and purchases like the ones I made at Costco. Baby steps, baby steps...

What to expect in the near future:

I will share some of the ways that I was successful this week that are ongoing. Tomorrow I start keeping track of all my expenses on my new iPhone. And new recipes are on their way!!! 

Saturday, April 28, 2012

Leftover Power: Turkey Croque Monsieur and Chickpea Salad


Leftovers: béchamel sauce and 1/2 can chickpeas


When I realized I would have some béchamel sauce left, I knew exactly what I wanted to with the sauce: Croque Monsieur. While I love cured pork products, I am not a big fan of ham, so I used turkey. This was a nice treat since I never buy deli meat.

The bread I used was Trader Joe's sourdough rye. This stuff is great! Just look at the color!

I had one-half can of chickpeas leftover and knew that was just the right amount for a salad. I was on my own for this part of the week so I didn't want to make something too big. This was just the right amount for dinner and a nice lunch.

A couple of tips about my melty sandwiches. Butter is a luxury in this home and we do not use margarine. I learned from  one of my favorite bloggers/cooks to use mayonnaise instead of butter for grilled cheese sandwiches. Just make sure to use a very thin layer. Works great! Another tip, use fairly low heat. This gives the cheese a chance to melt while the outside gets dark brown, crispy and not burnt. Enjoy!

Ready and waiting for the pan


Turkey Croque Monsieur

2 slices bread
2 slices turkey
1 slice Swiss cheese
2 tablespoons béchamel sauce
1-2 teaspoons Dijon mustard
butter or mayonnaise to spread on the bread
  1. Heat a non-stick skillet over medium-low heat.
  2. Spread a thin layer of butter or mayonnaise on one side of each slice of bread.
  3. On one non-buttered side, spread Dijon mustard and béchamel sauce. Layer turkey and cheese on top of this.
  4. Top with other slice of bread, buttered-side out.
  5. Place sandwich in pan. Let cook until bottom is browned, about 5 minutes.
  6. Turn sandwich over and cook other side until browned, about 5 minutes. Serve warm.


Chickpea Salad

1/2 can chickpeas, drained and rinsed
1/4 red onion, finely diced
2 Roma tomatoes, seeds removed and chopped
1/2 red bell pepper, seeds removed and chopped
1/3 bunch cilantro, roughly chopped
1 lemon, zest and juice
1 tablespoon white vinegar
1 tablespoon extra virgin olive oil
Kosher salt
Red pepper flakes, to taste
  1. Combine all ingredients in a large bowl. Season with kosher salt and red pepper flakes to taste. 
  2. Allow to chill in the refrigerator for 15 minutes or more before serving.

Tuesday, April 24, 2012

Roasted Cauliflower Béchamel Sauce


Inspiration: a head of cauliflower that cost $0.68/pound

I had a head of cauliflower and wanted to do something new. I started with a craving for roasted cauliflower with something creamy. I considered making a creamy roasted cauliflower soup. But I remembered recently discussing how soup is my comfort zone when trying new recipes. I began looking through recipes for inspiration. I kept finding suggestions for roasted cauliflower with a side of  béchamel for dipping or combined and baked as a gratin. Béchamel is super easy to make and the leftover sauce can be used in a number of ways. Here is my first adventure making bechamel sauce if you are curious.

I thought of a way I could take this traditional dish a step further: combine the roasted cauliflower and the béchamel. I began by roasting cauliflower and garlic. This dish would be much quicker if you just happened to have some leftover roasted cauliflower but is totally worth the time. Once cooled, I set aside 1 cup of the vegetable mixture. I placed the vegetables in a small food processor and added enough milk to process the mixture until smooth as possible. This is what I added to my basic béchamel recipe.

This sauce is delicious! The roasted veggies add a mellow nuttiness to the sauce. I love the combination of cauliflower and chickpeas so I served the sauce over chickpeas and brown rice with the remaining roasted cauliflower. What a yummy, satisfying meal. Enjoy!

P.S. In my next post, I will share how used some of my leftover Roasted Cauliflower Béchamel Sauce.

Roasted Cauliflower  Béchamel Sauce with Chickpeas and Brown Rice, serves 2

For the  béchamel:

3 tablespoons butter
3 tablespoons all-purpose flour
2 cups milk
Kosher salt
Freshly ground black pepper
Dash or two of cayenne pepper

For the roasted cauliflower with chickpeas and brown rice:

2 tablespoons extra virgin olive oil
1/2 15 ounce can chickpeas (about 1 cup cooked), rinsed and drained
1/2 head cauliflower, chopped into bite-size pieces
4-6 (or more) cloves garlic
Kosher salt
Freshly ground black pepper
  1. Preheat oven to 400 degrees Fahrenheit.
  2. In a mixing bowl, combine the olive oil, cauliflower, garlic, salt, and pepper. Evenly spread the mixture on a baking sheet.
  3. Bake until the cauliflower is lightly browned and tender, stirring occasionally through the cooking process, about 20-25 minutes.
  4. When cool, place about 1 cup of the vegetable mixture in a food processor. Add enough milk, 1-2 tablespoons, to puree until smooth. Set aside.
  5. Meanwhile, prepare the brown rice and chickpeas by cooking the chickpeas with the rice. If using canned beans or precooked beans, no need to adjust the liquid to rice ratio.
  6. To prepare the béchamel sauce, begin by melting butter in a large sauce pan. Add flour and mix with butter. Stir frequently. Cook until mixture is the color of sand, depending on temperature of pan, may take 4-10 minutes.
  7. Add milk and pureed roasted cauliflower mixture to pan, stir until incorporated. Slowly bring to a boil, stirring occasionally. Once sauce has reached a boil, turn heat down and simmer gently for 10 minutes.. Season with salt and black pepper.
  8.  To reheat the remaining roasted cauliflower, add the cauliflower to the rice/bean mixture after the rice has cooked and is sitting with the lid on the pot the warm burner.
  9. Serve the béchamel sauce over the rice, chickpeas, and roasted cauliflower.


Sunday, April 15, 2012

Crispy Tortilla Strips


I mentioned these Crispy Tortilla Strips in my last post about Fajita Soup. These little tortilla strips tasted deliciously naughty. Basically, I made homemade junk food.

There were two key reasons why these little bits of yumminess tasted like restaurant food:
  1. Plenty of oil
  2. Lots of salt.
I have made these both seasoned and plain with some salt. The seasoned version is far superior.

I have a few tips to make this recipe successful:
  • Layer the strips in a single layer. Any portions that are covered will not get crispy. A second baking sheet may be needed.
  • These strips go from perfectly crisp to totally burnt in moments. When they are done, immediately remove the baking sheets from the oven and take the strips off the sheets. Even the extra heat from the baking sheet can take the strips over the edge of doneness to burnt.
  • I suggest a fairly high oven temperature. These can be baked at different temperatures. The higher the heat, the less time required for perfect crispness. If you do dare for a higher oven temperature, make sure to watch the oven and be ready when the strips are done. Enjoy!


Crispy Tortilla Strips

3 corn tortillas, cut in half then  1/4 inch strips *
1-2 tablespoons canola oil
1/4 teaspoon smoked paprika
1/2 teaspoon cumin seed
1/4 teaspoon kosher salt
  1. Preheat oven to 400 degrees Fahrenheit.
  2. In a mixing bowl, combine all ingredients.
  3. Spread tortilla mixture evenly on a baking sheet, making sure no strips are overlapping.
  4. Bake 5-7 minutes or until crisp.
  5. Remove immediately from the oven and off of the baking sheet. Serve warm.
* I have only tried this using corn tortillas and do not know how well flour tortillas would work.

Sunday, April 8, 2012

Leftover Power: Fajita Soup


I challenged myself to make the best use of leftovers from two dinners. Z. and I had pasta with red sauce twice and there was still some red sauce left. We also had vegetables left over from some vegetarian fajitas.

When I am not exactly sure what direction I want to go, I make soup. Of course you already know of my undying love of soup. I also believe soup is a little forgiving. Anything can go in soup, especially if you just have a little tidbit left.

Fajita Soup was born! I would call this soup a cousin of Tortilla Soup. I took a little liberty with the vegetables and used my favorite spices so it has a different name. I prefer the marinara sauce to a can of tomatoes sauce in this recipe. The marinara sauce added more flavor and created a rich, red color.


I made some crispy tortilla strips to enjoy with the soup. These were so delicious they deserve their own post. I loved eating the strips as a side to the soup but I also had a few in the soup which thickened the soup slightly in a very lovely way. Enjoy!


Fajita Soup

1-2 tablespoons canola oil
1-1 1/2 cups vegetarian fajita mix *
1-2 small carrots, peeled and chopped
3 cloves garlic, minced
1/2 cup marinara sauce
1/4 teaspoon turmeric
1/2 teaspoon cumin
1/2 teaspoon smoked paprika
1 teaspoon harissa paste (or cayenne pepper to taste)
4 cups water **

Garnish: Avocado, lime juice, and crispy tortilla strips
  1. In a soup pot, heat the canola oil over medium heat. Add the garlic and carrots. Cook, stirring occasionally until carrots are just tender, about 5 minutes.
  2. Add the fajita mix and warm through.
  3. Add the turmeric, cumin, smoked paprika, and harissa paste, stir to combine, and toast about 30 seconds.
  4. Add the marinara and water. Stir and bring to a boil. Lower the heat and let simmer about 15 minutes.
  5. Season with kosher salt to taste. Serve with avocado, a spritz of lime juice, and crispy tortilla strips if desired.


* This particular batch originally started out as 1/2 onion (chopped), 1 bell pepper, 1 can of corn (drained), and 1 can of black beans (rinsed and drained).

** To make soup cook more quickly, I first heat the water to boiling in a hot water kettle before adding it to the pot.