Pages

Saturday, May 28, 2011

Recipe Review: Honey-Sesame Dressing from Vegetarian Times

This dressing was a nice change from my pungent Balsamic Vinaigrette, made even the more stronger by my favorite addition, fresh garlic. To see the complete recipe, here is the link. While making this dressing, I knew I should have listened to myself and used half as much honey, maybe a tablespoon or two at the most. Recipes are wonderful tools but we should follow our own tastes. I like my vinaigrettes more acidic and from making my own salad dressings, I know that for me, a touch of sweetness goes a long way.

Rice vinegar is a wonderful staple to have in the pantry. I find rice vinegar has a mild flavor that goes well with many different flavors; rice vinegar is one of the more universal vinegars. When I made this dressing, we did not have rice vinegar so I substituted equal parts white vinegar and lemon juice.

I can admit this: I am a little dense. Frequently... While eating my yummy salad I was thinking how clever this recipe is: a little sweet, a hint of sour, and the savoriness of the soy sauce. Hmmm... Maybe this is such a good recipe that I have made it a hundred times. I did not realize this was basically what I use as a stir-fry sauce until the second day of eating a salad with this dressing. Let us compare ingredients.

Honey-Sesame Dressing
1/4 cup honey
2 tablespoons rice vinegar
2 tablespoons soy sauce
1/4 teaspoon red pepper flakes
3 tablespoons vegetable oil
1 tablespoon dark sesame oil
sesame seeds to garnish salad
Starting on the end and moving clockwise: canola oil, honey, lemon juice, red pepper flakes, soy sauce, white vinegar, and sesame oil.
 To make dressing, combine all ingredients. I find a small jar with a tight-fitting lid the most convenient vessel to combine and store the dressing.

Cheap not Frugal Eats Stir-Fry Sauce
1 tablespoon soy sauce
1 tablespoon vinegar
1/2 tablespoon brown sugar
sesame oil, toasted sesame seeds, and red pepper flakes to garnish

I used smaller amounts because I was only cooking dinner for myself but the proportions are basically the same. I remember the moment I realized the two recipes were the same. I was marvelling at how much I liked the dressing with mushrooms and there was something vaguely familiar about the flavors. I started pondering a grilled mushroom salad with my new dressing. As I wiped up the drool, I figured out this was my stir-fry sauce. (I cannot completely claim it was my own. Z. will get grumpy when he reads me calling it mine. He was the person who taught me how to make the sauce.)

Great! I have two different dishes I can make with the same recipe. If I plan on using the sauce dressing on a salad, I will use honey. I like honey for dressings because I know that the honey will dissolve and I will not notice the texture. The brown sugar should be fine but there is always a little graininess in the sauce that goes away when it is cooked. Enjoy!

Wednesday, May 25, 2011

Recipe Review: Spoon Bread

Source: Vegetarian Times, 11/2007

I have a spiral notebook where I keep copies of recipes that I would really like to try. I am slowly making my way through them. This recipe of Spoon Bread has been in my notebook for quite some time, even before my new-found fascination with cornmeal.

I do not have much to share except that I quite liked this dish and will be making it again. The recipe calls for 1 teaspoon of salt. That is too much for my taste; 1/2 teaspoon is about right for me. I made a substitution with the milk. The recipe calls for 1 cup of milk, a reasonable amount, even in my cheap book. I do not have any milk and it is just too expensive right now for me to buy it but I do always have half-and-half for my coffee in the fridge. Since the milk was going to be baked, anyway, I used 1/4 cup half-and-half and 3/4 cup of water. This seemed to work just fine for me.
Cornmeal
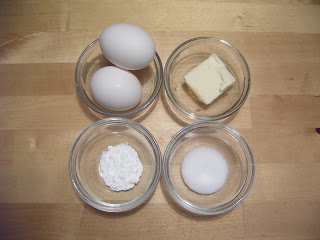
From top left clockwise: eggs, butter, salt, and baking powder
Half-and-half and water combination
Milk and egg mixture
Cooling cornmeal and baking powder
Ready for the oven!
Yum! Loved the smell of this baking.

Sunday, May 15, 2011

Ace's Adventures with. . . Leftover Polenta Loaf

Yesterday, I shared my first adventure cooking with cornmeal. Today, I will share some ideas for leftover Polenta Loaf.

I seem to have the same conversation repeatedly with folks who cook just for themselves: they hardly cook because it is only them. Of course, always at the ready to dispense cooking advice, I shared some of my thoughts for successful cooking for one. I have probably shared all these tips before but they are important enough to share again.

First, just do it! I have needed a little practice to get to this point but the food I cook now tastes better to me and is generally healthier than most restaurant food and anything prepared, unless it is Reser Macaroni Salad for $0.99 per pound (that has a special place in my heart).

Second, keep in mind you will have leftovers. The leftovers of some dishes are yummier than the original dish. Take Indian food for instance. Z.'s dal or chana masala (I have nothing to do with cooking Indian cuisine in our household because Z. is so incredibly good at it) tastes great when he makes it but tastes amazing the next day, too.

Third, make meals that freeze well. When I make soup, as soon as the soup is cool, I make sure to freeze a portion. I always have a yummy meal waiting for me when I am too lazy or unimaginative to cook. Leftover pizza freezes very well, too. When we go out for pizza, we try to freeze a few slices. Recipes that we freeze frequently besides soup are Indian food and marinara sauce. We make a pot of marinara sauce, when it is cool we portion it, and freeze. I find freezing my leftovers is freezer bags works the best, even liquids. Carefully, spoon the leftovers into the bag, squeeze out as much air as possible, and freeze it laying down flat. If they are flat, they stack very nicely.

Fourth, get creative with the leftovers. Create dishes where you can transform the leftovers into a completely new dish. Get creative!

The first time I cooked my Polenta Loaf on the stove-top, I was not pleased with how golden I was able to get it; I wanted something a little crustier. I think I was impatient. When I tried frying the loaf a second time, I changed a few small details. Instead of taking the loaf directly from the refrigerator to the hot pan, I let it warm up a little first. I forgot to take it out, so after I made my slices, I microwaved the Polenta Loaf slices for about 25 seconds, enough until the refrigerator chill was removed. This time, I knew that it would take some time for the slices to develop a nice golden crust. I let them sit in the hot pan until they were nice and crusty, it probably took almost 15 minutes over medium heat. I have no idea if this is unusual and I am doing something wrong but that is how long my Polenta Loaf needed to get the crust I wanted.
The first night I had Polenta Loaf, I topped it with marinara sauce with red beans. I knew tomatoes were traditional with polenta so I thought this was a safe route.
My next adventure with Polenta Loaf involved adding a little smoked paprika to my sauce and topping everything with a little cheese. Basically, I had chili on top of my Polenta Loaf.
Z. came up with this third variation: Polenta Loaf Sloppy Joes. Okay, Mr. Bacon-Eating-Vegetarian had no idea what a Sloppy Joe was; he did inspire the idea. We were chatting about what I could top my Polenta Loaf with for that evening's dinner. Z. asked if bbq sauce would be good on top of Polenta Loaf. Sure, probably but what else am I going to have with it. I have ground turkey in the freezer! I can make sloppy joes using spiced up bbq sauce. I must say, this was very tasty.

Ideas for Polenta Loaf that I have not tried:
  • Top the browned slices of Polenta Loaf like a pizza. To melt the cheese, place in an oven safe dish, and broil for a couple of minutes until melted and bubbly.
  • When first cooking the cornmeal/polenta, before pouring the mixture into the loaf pan, mix in cheese.
  • Instead of cutting the Polenta Loaf into slices, use a cookie cutter for fun shapes.
  • Top with sauteed vegetables.
  • Do not fry the Polenta Loaf slices; rather, turn into a baked dish by placing slices in a baking dish and topping it with your favorite toppings, and bake it.

Saturday, May 14, 2011

Dinner for One: Polenta Loaf

I undertook another ingredient adventure with a very common ingredient that I really had not worked with before: cornmeal. Besides this recipe, I have a couple more cornmeal recipes I would like to try. After all, one of the reasons a frugal pantry works is that there are several different dishes you can make from one ingredient. I will dutifully report the results.

Technically, I do not know if what I made was polenta but I am sticking with the name Polenta Loaf. The only alternative I could come up with, Cornmeal Log, does not sound very appetizing. Polenta Loaf it is!

When trying an ingredient for the first time, I like to buy just what I need from the bulk section, if possible. I know in come cases, the price per ounce will be higher but that is made up for by spending exactly what I want and I am not stuck with food that I may not like. For this recipe, I bought a little over a cup of cornmeal from the Market of Choice for $0.80. One cup of cornmeal filled a whole loaf pan! That is a lot of food for $0.80.
The cornmeal I purchased may have been instant cornmeal (if that is a real thing) or my cooking method could have affected how my cornmeal cooked. I just do not know. I brought 3 cups water with a pinch of salt to a boil in a large saucepan. While waiting for the water to boil, I combined one cup cornmeal with one cup water in a bowl. When the water was boiling, I poured in the cornmeal-water mixture, stirred with a wooden spoon until completely smooth, and it was done. The only work I had left was pouring the cooked cornmeal into a greased loaf pan and wait for it to cool. That quick cooking time may be worth $1.59 per pound.
I saved this ingredient adventure for a night when I knew Z. was working, like this recipe. I have been extolling the possibilities of polenta loaf for ages. If it did not turn out, I did not want to give Z. the opportunity to make fun of me for it. I also forgot that he would be working late two nights in a row combined with not knowing how voluminous cornmeal could be, I made too much. I should have used 1/2 cup cornmeal and 2 cups water.

Tomorrow, I will post my adventures with Polenta Loaf leftovers. After having Polenta Loaf for three days in a row, I tried a couple of variations myself. Enjoy!
Polenta Loaf topped with marinara sauce with red beans

Polenta Loaf

4 cups water
1 cup cornmeal
pinch of salt 
cooking spray for loaf pan
  1. Prepare polenta or cornmeal according to package directions.
  2. Once cooked, pour polenta into a greased loaf pan and allow to cool at room temperature or in the refrigerator until firm. 
  3. Remove polenta loaf from pan. Cut into desired thickness. A thicker slice will by crusty on the outside and creamy in the middle once cooked while a thinner slice will be more firm once cooked.
  4. Heat 1-2 tablespoons canola oil in a non-stick skillet or cast-iron skillet over medium heat. Place polenta slices into how pan and do not move. Allow to cook until golden. This make take 10-12 minutes for the first side.
  5. Once the first side is golden, carefully flip over and cook until second side is golden.
  6. Serve with toppings of your choice.  
 

Thursday, May 5, 2011

Dinner for One: Black Bean Salad

My black bean salad is another recipe suggestion. All the veggies that I love in salads were on sale this last week so I made it twice! When deciding what vegetables or fruit to put in a salad, besides price and flavor, I think about texture the most. I want several different types of crunchy or firm vegetables in my salad and only one item is on the softer side, like tomatoes, or in this case mango. Salads like this taste awesome on their own but I make a meal out of it by combining it with one of my favorite grains like millet, bulgur, or couscous (not a grain I know, but it was what I had last night with my salad). Here is the recipe for the salad I made this week. Enjoy!

Black Bean Salad

2 tablespoons white vinegar
1 tablespoon lemon juice
1 tablespoon olive oil
1 can black beans, rinsed and drained thoroughly
1/2 cucumber, diced
1/2 mango, diced
2-3 carrots, peeled and chopped
1/2 red onion, diced
1/3 bunch of cilantro, chopped
1 jalapeno, seeded and diced finely
2-3 garlic cloves, mined finely or grated
kosher salt
red chili flakes, optional
  1. Combine vinegar, lemon juice, and olive oil in a mixing bowl. 
  2. Mix vegetables and fruit with dressing and seasoning liberally with salt. Taste to adjust seasonings. If you like, season with black pepper and red chili flakes if you like things spicy.