Pages

Wednesday, September 29, 2010

Spicy Chickpeas (chole chaat)

An easy, tasty Indian recipe! I love cooking Indian food. It makes the apartment smell amazing and always makes me happy to make. It's something I have had to turn learn to do from trial and error. I didn't even try Indian food until I was in college. I should probably mention that Z makes most of our Indian food and I get to be his assistant. I may not be able to make dal like him but I sure can bake.

And, moving on. I've discovered that some folks' chole chaat is more like mine, warm beans in a sauce, or it can be made more like a salad and served room temperature. This is just one variation among many. The chili adds some nice spice and flavor, while the garam masal adds warmth and spice. Then there is the lemon juice. Whoever thought to add lemon juice is brilliant. It adds a brightness and acidity that cuts through everything. My dish is rather beige looking. A little cilantro would be a great addition. Also, if you let your besan or chickpea flour toast more, you will get a deeper color. While we're on the subject of besan...I'm sure you could substitute the besan with another starch. I like it because it tastes good and it's very high protein since its made from chickpeas. It is on the pricey-side. I have never seen it less than $3.25 per pound. Potato is traditional in this dish. I think it's great without potato. Or, when potatoes are on sale, add a little extra to stretch out the beans. Here is one version of chole chaat. Enjoy!

Spicy Chickpeas
1 can chickpeas, drained and rinsed (if using dry, 1 cup dry is probably reasonable)
2 medium potatoes, boiled or baked, peeled and cubed
2 generous tablespoons of oil
1/4 besan (chickpea flour)
1 tablespoon grated ginger
1 seeded and diced serrano
1 teaspoon cumin
1/2 teaspoon black pepper
salt to taste, 1/2 - 1 1/2 teaspoons
1 tablespoon garam masala
1 tablespoon lemon juice (2 tablespoons if you really like the brightness)
1 1/2 cups water

  1. Heat oil in a pan large pan, heat the oil. Add the besan. Toast until it turns golden brown or about 2 minutes.
  2. Add chili and ginger, stir for a few seconds. Then, add the water and chickpeas.
  3. Add the cumin, black pepper, and salt. If you like, mash some of the chickpeas as you mix in the seasonings. Turn the heat down to low and simmer 10-15 minutes.
  4. Add potato, garam masala, and lemon juice. Mix carefully and let simmer about 5 minutes. Serve with rice or bread.

Monday, September 27, 2010

The Tale of the Quiche that Wanted to be a Spinach Pie


A few weeks ago, I spent some time visiting my family in Wyoming. My dad is a wonderful cook and an expert at cooking...STEAK. Steak and potatoes are awesome but not every day, or at least I think I don't think so. While I am visiting, I cook something new for my folks that is more in line with what I eat at home on a regular basis. Luckily for me, mushrooms and eggs (.99/dozen!) were on sale while I was there. I had been thinking about making quiche for awhile so this was the perfect opportunity.

I had found a recipe for a casserole in Vegetarian Times December 2009. I wasn't too interested in the casserole. I did think the crust they made for it had lots of potential. I am always on the hunt for a crust that doesn't involve too much butter or shortening. Since it is not my recipe, I don't feel like I should post it. Here is a link to the recipe, though. http://www.vegetariantimes.com/recipes/11149?section=

I found that refrigerating the dough before pressing it into my baking dish made it easier to work with. It wouldn't be enough dough for a larger pan without some adjustments. I enjoyed it and thought it worked well for what I needed.

For the filling, I sauteed mushrooms with garlic and green onions (they were on sale too). I used frozen spinach that I had thawed and squeezed out as much moisture as I could. I used about 10 ounces of spinach, the amount in a box of frozen spinach. I mixed the spinach and mushroom mixture together with lots of pepper and salt. Then placed it evenly on my crust. I thought for my little dish, four eggs would be plenty. I beat the eggs in a bowl then poured them over the vegetables and made sure they were covered by the eggs. I didn't feel like adding any cheese this time. I popped the quiche into the oven which had been preheated to 375 degrees. I took it out when the middle wasn't jiggly anymore.

I let it cool down a little before cutting into it. I was so excited to try my quiche. There was so much spinach that it wasn't a quiche. It tasted great! Next time, I am going to use three eggs. All the veggies will be held together but I don't think you will be able to tell that there are eggs in it at all. If Z doesn't notice and still eats it, I will have been successful. Enjoy!

Saturday, September 25, 2010

More Adventures with Hummus

Ninja: The coolest kitchen appliance ever!

I know I have already shared a hummus recipe (Hummus!) Redundancy is not unusual with me. If you can't handle repetition, never ever ask me to tell a story. I have a serious problem repeating myself and telling you the same story over and over again. With food, I love figuring out lots of different ways to use the same basic ingredients or make the same dish taste different. I love my hummus recipe but we had some ideas we have been wanting to try. What would happen if we cooked the garbanzos first? It's amazing!

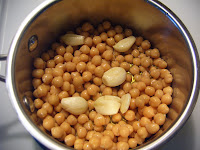
We rinsed and drained the garbanzos and added them to a small pot with a fair amount of olive oil and some garlic and cooked it over low for awhile. The beans will release some water so leave the lid off the pot. We let everything cool down before we made the hummus. I always add olive oil and lemon juice to taste and until the it reaches the consistency that we like. Don't forget, lots of black pepper. This new version of hummus was extremely smooth, nutty, and tasted the most like hummus from the store. Enjoy!

Thursday, September 23, 2010

Pantry Meal: Vegetable Soup


Yesterday I reorganized and took inventory of the pantry. Only the spice cupboard left! I have a stash of various cans that will be expiring soon. Lots of plans for those. Tonight's dinner, Vegetable Soup used only things that we always keep in the pantry and a couple of fresh things. Soup can always be adjusted to what you have on hand and you're own tastes. Our soups turn out differently every time. Here is what was in tonight's dinner!

Ingredients:

2 cans (14 oz. each) veggie broth
1 can kidney beans, drained and rinsed
1 can asparagus
1 can corn, drained and rinsed
2 fresh carrots
chopped onion
2 cloves garlic, grated
1 serrano chile, diced
black pepper
Italian seasoning
bay leaf

We started by sauteing the onions and carrot in a little olive oil. When the onions started to get soft, we tossed in the chile and garlic. Then, added everything else and let it simmer for 20-30 minutes. Z cooked some pasta and added it to his bowl of soup.

At first, I wasn't going to include a price breakdown of this meal because it is so variable on whether or not you got the canned items on sale, how good the sale was, what you use, and how much. After much pondering, For instance, we could have saved $0.60 is we had only used one can of broth. But, we wanted to use it before it expired and have been saving them for so long we just used them. I realized I was really curious how much this meal cost us. Here it is.

Price Breakdown:

1.20 veggie broth
.48 kidney beans (coupon!)
.33 canned asparagus
.33 canned corn (by the way, canned corn is really tasty - it has a nice crunch)
.10 carrots (.98/2 lb bags at Winco - they are even cheaper at Fred Meyer, though)
.15 onion (we used most of a small onion. They are .48/lb at Fred Meyer!!!!)
.06 garlic (.33/head)
.04 serrano
spices - negligible

Total: $2.69 or $.336/serving (8 servings)

Frugal, fast, and tasty. Enjoy!

Monday, September 20, 2010

Don't Just be a Coupon Collector...Be a Coupon Scavenger

In an earlier post, http://cheapnotfrugaleats.blogspot.com/2010/08/aces-tips-on-becoming-cheap.html I discussed the importance of collecting and picking up coupons whenever you see them. This week, that tactic has worked out really well for the Cheapskate Household. I was in Wyoming two weeks ago. As I was wondering the aisles of a grocery store, I picked up any coupons I could find. Different markets may have different coupons. I picked up a small handful of coupons for $1 off of Wheat Thins, something both Z and I like. The coupon will expire in two months and is not doubleable so I only grabbed a few. Okay, I grabbed eight instead of twenty. These coupons are going to come in handy in this week's Safeway sale! We can get Wheat Thins at $1.49 a box if we buy five at a time. Between the sale price and our coupons, we will pay $2.45 for five boxes of something that we really like. If I time the grocery shopping adventure just right, we will get cashier who thinks I'm cute and will double my coupons, anyways, bringing the total to $0.45.

Take advantage of traveling. Check out the grocery stores while you are in new places. Not only will you see what is popular in other places, you might find products you've never seen before, good and bad. And you just might find different coupons!!! About two years ago, Z was on a work trip in Washington. He found a display pad of coupons for Starkist Tuna pouches. He doesn't eat fish but he knew that this was my favorite brand of tuna so he grabbed all of the coupons. I know, we're not the nicest couponers. We held onto those coupons for a long time. Right before they were to expire, there was an amazing sale plus a catalina deal at one of the grocery stores in town. Not only did I get 113 free pouches of tuna that was not going to expire for two to three years, we made $11 with the catalinas. Enjoy!

Sunday, September 12, 2010

RIP Caramel Sauce

My life was never the same after making caramel sauce from scratch. I had no idea I could take something so basic as a little sugar and cream and create the most amazing caramel sauce I had ever tasted. I think I told everyone I ran into for the next week about the caramel sauce I made and how proud I was of myself. I would not shut up about this bowl of caramel sauce.

So, when I was invited to dinner to my friends' home, I really wanted to bring something special. First, I hadn't seen my best friend in probably three years and her mom was kind enough to spoil me with spices. http://www.cheapnotfrugaleats.blogspot.com/2010/09/i-am-spoiled.html

They are the best hostesses so I probably wasn't allowed to bring something over but I didn't ask. I was wracking my brain trying to think what would be nice. Caramel sauce and ice cream!!! A fantastic excuse to make caramel sauce.

I got the Ina Garten recipe I like and have seen her make on tv multiple times. http://www.foodnetwork.com/recipes/ina-garten/caramel-sauce-recipe2/index.html

The only ingredients are:

sugar

water

heavy cream

pure vanilla extract

I started making the sauce. Everything is going as it should. I start having a problem a with the sugar crystalizing. This happened last time but I kept cooking it and it turned out fine. I keep cooking, it starts to change to that beautiful warm brown color. I add my cream at perfect moment. It's a lovely caramel color and I DIDN'T BURN THE SAUCE. Something is wrong! It is a funny color and doesn't start to get thick like it is supposed to. The sauce smells like amazing caramel sauce but looks funny. It did not turn out and I had to throw it out.

Learn from my mistakes. I have no idea how each of these things affected the sauce but they were different than what I had done with my successful, yummy sauce. I used imitation vanilla, rather than pure vanilla. I think I chickened out and didn't turn the heat up enough when I was supposed to. I am pretty sure this is what caused the crystallizing. And, I used heavy whipping cream instead of heavy cream. I stood in the dairy row at the store for a good long while staring at these two little cartons deciding what to do. I went back to the house with the carton of whipping cream because it cost half as much as the heavy cream. They seemed pretty similar but must not have been similar enough. Next time, I am definitely getting the heavy cream. RIP Caramel Sauce of September 9, 2010. I will remember you as I eat your successful caramel sauce pal sometime in the near future.

Friday, September 10, 2010

I am spoiled!!!


Thanks to the powers of a very popular social networking website I can be a lot more nosey and keep in better touch with some wonderful people who live across the country. And, not to mention, have lots of mini-conversations about food. One of my friends, who also happens to be the mother of one of my best friends, was having a conversation on the wall of a mutual friend about a homemade french toast spice blend. The mutual friend shared she had put some on her coffee. Coffee and spices after just discovering the amazingness of coffee and cinnamon! Of course I had to butt in. So my dear friend, being as sweet as she is, offered to give me some the next time I can into town. Well, I had a plane ticket to be there in thirteen days. We're trying to catch each other and playing phone tag. I wake up and I have a text message to stop by and pick up the spice. I am so excited to see her, first of all, but I walk in and there is this pretty gift bag all for me. It's filled with amazing homemade goodies!!! I am in hog heaven. There is a picture of all my goodies above. From left to right: hot chocolate mix, sesame pancake mix, 9 bean soup mix, white hot chocolate mix, and french toast spice. Yum!

Wednesday, September 8, 2010

Apple Cake


My dad holds on to recipes to share with me when I come visit. And, this visit was no exception. He had held onto a newspaper insert called Relish (September 2010) for me to take home. He was really interested in this apple cake recipe that was in it. Since he had a bundt pan, why does someone who doesn't bake have a bundt pan is beyond me, I decided to try the recipe.
This is one of those recipes, that even as you are putting together, it's like sunshine in your kitchen. You can't go wrong with anything that involves desert, apples, and cinnamon. Of course, I made a adjustments to the recipe to fit my taste, which I will share, but here is the original recipe. Ok, in all honesty, sometimes I don't follow a recipe exactly because I'm not paying close enough attention.


Apple Cake
6 cups peeled and thinly sliced Granny Smith apples (about 3 large)
1 1/2 cups, plus 5 tablespoons sugar
4 teaspoons cinnamon
3 cups all-purpose flour
1 tablespoon baking powder
1/2 teaspoon salt
4 eggs
1/2 cup light brown sugar
1 cup vegetable oil
1/2 cup orange juice
2 1/2 teaspoons vanilla extrat

1. Preheat oven to 350F. Grease, sugar, and flour a 10-inch bundt or tube pan.
2. Combine apple slices with 5 tablespoons granulated sugar and cinnamon; set aside.
3. Combine flour, baking powder, and salt in a bowl and set aside.
4. Beat eggs with remaining granulated sugar and brown sugar. Add vegetable oil, orange juice, and vanilla; beat well. Gradually blend in flour mixture and mix until well-blended.
5. Pour one-third of the batter into the pan. Top with half the apple slices, draining off any liquid [I couldn't bear to part with the teaspoon or so of cinnamon-y goodness so I mixed it into the remaining batter}. Pour in half the remaining batter and top with remaining apple slices. Top with remaining batter, making sure the apples are covered.
6. Bake 55 to 60 minutes, until the top turns golden brown and a knife inserted near the center comes out clean. Let cool 10 minutes in pan. Turn out onto a wire rack and let cool completely. Serves 16.

Price Breakdown (for the way I made it)
1.52 Apples (1.27/pound)
.17 1/2 cup sugar + 5 tbs (2.50/5 pounds)
.15 cinnamon and vanilla
.24 flour (1.50/5 pounds)
.07 baking powder
.33 eggs (on sale this last week .99/dozen)
.42 vegetable oil (2.50/48 oz)
.25 orange juice (1.99/half gallon)

Total: $3.15 or $0.39 for each huge slice (8 slices)
I had already started making the cake when I tried looking for the brown sugar. Fail. I couldn't find any and I didn't catch I needed 1 1/2 cups of sugar. It was plenty sweet without the extra sugar. The recipe in the magazine said that you could use milk in place of the orange juice. That's what I would do if I were at home since I never have o.j. It was delicious. Enjoy!


Monday, September 6, 2010

Warm Honey Cardamom Milk


I remember the first time I ever experienced cardamom. It wasn't until I was 25 years old. I was having a meeting with one of my absolutely fabulous graduate school professors at a local coffee shop. When we met for coffee before at this place, she would get a honey cardamom latte. It smelled divine! So, that was what I had on this day. Oooooooo.M.G! It was amazing. The darkness of the espresso, the sweetness of the honey, and that one of a kind of flavor of cardamom was incredible.


I eventually purchased cardamom from my local Indian grocery store (a fantastic source of spices at great prices). It was one of the biggest splurges I have made in ages. I have become so much more cheap that spending $7 (on a good-sized container, by the way) was crazy to me. But I am so happy I did. It may be the most expensive spice in our cupboard but you only need a little. Every once in awhile, I will open the jar and smell the cardamom. I must look crazy standing there, holding a jar with the biggest, dumbest grin on my face because the smell makes me so happy.


Back to the recipe.


milk

a few teaspoons of honey

maybe 1/2 tsp of ground cardamom or a few pods

a few drops of vanilla (optional)


I put the cardamom in a small dry pot on the stove, pretty low heat and heat the cardamom up until it is really fragrant. Then I add the milk. If I am feeling really patient, I will let the cardamom and milk steep on low for like twenty minutes. When I am ready to drink it, I add the honey and vanilla. Ground cardamom, especially if you add a lot and depending on how finely ground yours is, can feel a little gritty. If you couldn't handle that, use the pods because you would take those out before drinking or strain the milk before serving. Enjoy!