Pages

Sunday, January 11, 2015

Recipe Review: Chicken Paprikash


I have to admit I've had chicken paprikash one time and it was in a soup version. I really enjoyed the combination of tangy, creamy sauce with the smoky chicken. Having no idea where to start or what makes a good chicken paprikash, I decided to try the recipe for Chicken Paprikash from Annie's Eats. What drew me in was her warm and inviting photographs but what kept me browsing was her straightforward recipes. I found a few more I'd like to try, particularly the sweet potato scones with maple cinnamon butter and mushroom gouda quinoa bake.

Let's get back to what I did make. The ingredients were very simple and what you probably already have on hand:
  • chicken
  • olive oil
  • salt and pepper
  • onion 
  • garlic
  • sweet paprika
  • flour
  • broth
  • can diced tomatoes
  • sour cream or Greek yogurt
  • noodles (or in my case, fettucine)
The recipe was very easy to put together, just a little sauteing and simmering. I repurposed some leftover roasted chicken letting it heat through in the sauce. The tomatoes added a nice layer of flavor to the tangy sour cream. Since it was just me, I had leftovers a few days in a row which kept just fine. Make this and enjoy!

Sunday, December 14, 2014

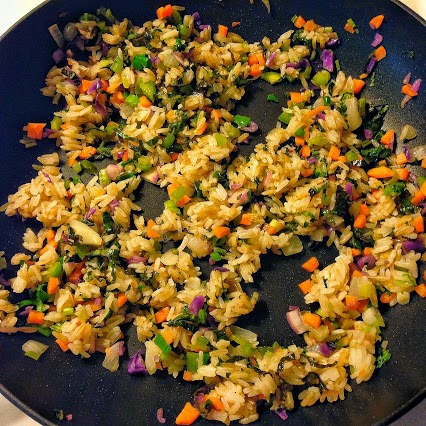
Basil-Mint Fried Rice


How many variations of stir-fry can this lady make? Hmmm... Probably a few more. Rice and veggies are always in my kitchen.

From left to right: Mint, cilantro, and basil.
There are a few details that set this stir-fry apart from the others. The most obvious is the addition of fresh basil, mint, and cilantro after cooking. If you ever have a chance, do try Thai basil (you just might have to grow it yourself). It's peppery, anise-y, spicy basil flavor is delicious in stir-fry but in my case, I used good ol' Genovese basil. 

In order to make the flavors more integrate, I also chopped the vegetables very small. This way you get a bit of everything in one bite.

Frozen basil cubes
Fresh herbs are fantastic when available but are not always a feasible option. I found a few vendors at my farmer's market who had an abundance of basil at prices I was willing to pay. I washed the basil and let it dry. Then I put the leaves in my mini-food processor with enough olive oil to get things moving. I pulsed the basil, adding a drizzle of oil as needed, until the basil was basically a paste. Then I spooned the basil paste into ice cube trays. The oil is necessary because basil will turn black if frozen on its own. I was concerned about the basil absorbing any scents from the freezer so I wrapped the ice cube trays in plastic wrap. Once the basil cubes were frozen, I removed them from the ice cube trays and placed them in a freezer bag. 

These are very simple to use. I just drop one or two into the pan of whatever I'm cooking right at the end, whether that's stir-fried rice, pasta, or tomato sauce. Enjoy!

Sunday, October 26, 2014

I'm Back!


I'm back! I took a hiatus from the blog for several reasons. One reason: I felt self-conscious about what I could offer readers (sometimes the only way I had a recipe to share was to share my failure), my interests are eclectic, and my blog doesn't look or sound like some of my favorite writers. I realized I was taking myself way too seriously. I have given a lot of thought to what the blog has brought into my life and the reasons why I want to continue. Here's where my focus will be:
  • Recipes! I'm inspired to create again and have some ideas in mind. I have learned that I'm much more productive when I make myself share what I have created. For a time, I felt bad that my seasonal recipes always felt behind the times. For example, I have a few ideas for fresh basil to share and now the world is moving on to winter squash and farro. I'm just going to have to get over it.
  •  I'm also going to do a lot more recipe reviews. There are so many incredible cooks and ideas out there, I'd like to give more of them a chance. Let me know if you have any recommendations!
  • Photography. I took photos of my food because I thought that's just what I'd have to do to have a food blog. It was drudgery and still is but I have discovered the joy of photography and trying to hone one's craft. I will slowly share my work and glimpses of my adventures (the picture at the top is from my birthday trip to Monterey, California!).
  • Interviews. I have always wanted to include interviews since I started. I love learning about other people and their journeys, but again, felt too self-conscious to make the effort. By making myself put this into words, I am one step closer to making it happen.
As always...enjoy!

Friday, February 7, 2014

Review: Steffi's Bakery and Confections


BIG NEWS!!!! Like life-changing in the best way possible for the whole entire world: you can now buy candy and other treats from one of the best pastry chefs on the planet, Stephanie Matthews, through her Etsy shop, SteffisConfections

Stephanie's artisanal creations are incredibly delicious and of the highest quality. She takes so much pride in her product that every purchase is made-to-order. Here is a rundown of Stephanie's current offerings:
As you can see from the photo above, I have had the pleasure to sample Stephanie's vanilla caramel, sea salt caramel, salted caramel turtles, honey nougat, and peanut butter fudge. Everything was delicious! If you are a caramel fiend, like myself, you will absolutely love the caramels and turtles. If you aren't crazy about caramel, consider Stephanie's caramels as a gateway to a new-found love because these confections are by far the best caramels I have ever eaten. I had never tried handmade nougat until now. What sets these nougats apart is Stephanie's use of smoked almonds and honey she has sourced locally in Colorado Springs where she is based. The delicate hint of the honey layering with the smoked flavor of the almonds in a soft bed of nougat is mouthwatering.

In addition to Etsy, you can find more information about Steffi's Bakery and Confections on her Facebook page or email her at steffieconfections@gmail.com. Enjoy!

Friday, January 3, 2014

Dinner for One: Butternut Squash Ravioli with White Wine Mushroom Sauce


It was fall and I had lots of winter squash, of course I was going to make a ravioli. This time I tried roasted butternut squash. This is the first time I've used butternut squash and I was so pleased with the results that I have compulsively bought two more. The texture is much more creamy and mild than some of the other squash varieties I have tried.

The ingredients for the White Wine Mushroom Sauce.

Ravioli waiting for a warm bath. Wonton wrappers are the key.

My shallot-mushroom sauce was a winning combination with the butternut squash ravioli. The earthy mushrooms combined with a bit of bright white wine (sauvignon blanc is my preferred white wine to cook with) complemented the squash's nutty flavor. Garnish with bright, grassy parsley. My recipe made just the right amount for me but could easily be doubled.

Here is a link to my recipe for ravioli, which shares a few tips and tricks I learned along the way.  

For my ravioli filling, I pureed 1 cup of roasted squash with salt, pepper, and enough cream to make it smooth. I think Lisa Leake's recipe for butternut squash ravioli filling from 100 Days of Real food sounds delicious! She seasons her filling with a bit of maple syrup, orange zest, nutmeg, cinnamon, and bit of cheese.

Another version of the sauce with a splash of half-and-half.
My mushroom sauce was so good that I made it again immediately. This time I added a splash of half-and-half. Enjoy!

White Wine Mushroom Sauce

by Ace Nation
Ingredients (serves 1-2)
  • 2 tablespoons butter
  • 1 tablespoon extra-virgin olive oil
  • 1 large shallot, finely diced
  • 3 cloves garlic, minced
  • 1/2-3/4 cup sliced mushrooms, such as button or cremini
  • 1/2 cup white wine, such as sauvignon blanc
  • Kosher salt, to taste
  • Freshly ground black pepper
  • Fresh chopped parsley, to garnish
Instructions
In a skillet, heat butter and olive oil over medium-low to medium heat until butter is melted.
Add shallot, stirring occasionally, cook until translucent, about 5 minutes.
Add garlic and mushrooms, stirring occasionally, cook until vegetables are tender, about 5 minutes.
Add wine. Simmer for 5-7 minutes. Season to taste with salt and pepper.
Serve over ravioli, or pasta, or sauteed chicken. Garnish with fresh parsley.
Enjoy!
Powered by Recipage

Wednesday, December 11, 2013

Lentil and Rice Cabbage Roll Soup


One of my more popular posts is my recipe for Lentil and Rice Cabbage Rolls. The filling is hearty and tasty, wrapped in tender cabbage leaves topped with one of my favorite foods in the world: Z.'s red sauce.

I wondered if I could take this labor-intensive recipe and turn it into a meal that still had all the same flavors of the original but was much simpler. For me, of course that meant a soup. I must say, while the original recipe was delicious, I think this soup is even better.

A soup version of lentil and rice cabbage rolls has several advantages:
  • The sauce/broth simmers for about 20 minutes creating a rich base for the rest of the ingredients. 
  • This soup is a good use of leftovers, especially if you prefer to cook your lentils and rice separately.
  • Meat-eaters and vegetarians alike will be happy. My recipe is vegetarian but meat can easily be added. For my last leftover meal, I browned up about 1/4 pound of hamburger and included that in my soup. 
Enjoy!

Lentil and Rice Cabbage Roll Soup

by Ace Nation
Keywords: soup/stew beans/lentils cabbage rice tomatoes
Ingredients
  • 2-3 tablespoons olive oil
  • 1 onion, finely diced
  • 4 garlic cloves, minced
  • 1 red chile pepper, such as Fresno, seeds removed and minced
  • 1-2 carrots, peeled and diced
  • 1/2 head cabbage, chopped
  • 1 14.5 ounce can diced tomatoes
  • 1 12 ounce can tomato sauce
  • 6 cups stock, chicken or vegetable
  • 2 teaspoons smoked paprika
  • 1-2 teaspoons Italian seasoning
  • 1 1/2 cups lentils, cooked
  • 1 cup cooked rice
  • Kosher salt, to taste
  • Black pepper, to taste
Instructions
In a large soup pot, heat oil over medium heat. Add onion. Cook, stirring occasionally, until translucent, just beginning to brown, about 10-12 minutes.
Add garlic, chile pepper, and carrots. Cook, stirring occasionally, until carrots and garlic are tender, about 5 minutes.
Add diced tomatoes, tomato sauce, stock, smoked paprika, and Italian seasoning, stir until combined. Bring to a boil, lower heat, and simmer 15-20 minutes.
Add lentils and cabbage. Simmer until lentils are heated through and cabbage is tender, about 10 minutes. Season to taste with salt and pepper.
To serve, place about 1/4 warm rice in bowl, top with desired about of soup.
Enjoy!
Powered by Recipage

Thursday, November 14, 2013

Ensalada Caribeña Recipe


The other day I shared a bit of information about ensalada caribeña. Well, here is the recipe. Enjoy!
 
Ensalada caribeña: Caribbean Cabbage Salad

by Ace Nation
Keywords: raw vegan cabbage citrus Caribbean
Ingredients (serves 3-4)
  • 1/2 green cabbage, finely shredded
  • 1/4 red or purple cabbage, finely shredded
  • 1 large carrot, grated
  • 1-2 red chile peppers such as New Mexico or Fresno, or 1/4 cup red bell pepper, diced
  • 1/2 bunch cilantro, chopped (don't skimp!)
  • Juice from 1 orange, about 1/4-1/2 cup orange juice
  • juice from 1 lime, about 1/4 cup lime juice
  • 1 tablespoon extra-virgin olive oil
  • Kosher salt, to taste
Instructions
In a mixing bowl, whisk together, orange juice, lime juice, olive oil, and kosher salt. Taste for seasoning. In a large mixing bowl, combine vegetables with desired amount of vinaigrette. Enjoy!
Powered by Recipage

Tuesday, November 12, 2013

Ensalada Caribeña: Cuban Cabbage Salad


Besides winter squash, my current obsession is cabbage. It all started with my frugal rice salad. Then I became interested in expanding my knowledge of Latin cuisine. So far this year I've made ensalada de remolacha (Cuban beet salad) and ensalada de repollo (Latin cabbage salad). Both recipes feature vegetables that are available year round without a noticeable different in quality. The ensalada de repollo was a great addition to my fall line-up of soups. It was bright, fresh, and raw. Qualities that I probably wouldn't use to describe many of the side dishes found on the table this time of year. I wanted to continue to experiment with the possibilities.

Z.'s favorite salad from Pambiche is their ensalada caribeña, or Caribbean salad. It's a red and green cabbage salad with carrots and herbs dressed with a refreshing citrus vinaigrette. I tried creating my own version of ensalada caribeña. 

I have enjoyed this recipe several ways. First, I enjoyed my Caribbean salad as its own meal, making a healthy lunch. I also a small plate of the salad as a side dish to my Fall Squash Soup. The bright, citrus flavors will complement all of fall's most popular dishes. Come back soon for the recipe!

Sunday, November 10, 2013

Fall Squash Soup Recipe


I've shared a recipe for Acorn Squash Soup before. Tasty but it didn't become a regular in the rotation. I even tried a variation I never posted that used substituted half the the acorn squash with yams to see if I could get it right. Still didn't become a repeat recipe.

I was inspired by a recent visit to Les Caves. I thoroughly enjoyed their Autumn Squash soup. I don't have confidence that I figured out every ingredient in the Les Caves soup, I have a few ideas why their soup was so good:
  • it was simple
  • different types of squash were used to give a complex, nuanced flavor
  • lots of browned onions or shallots
  • and the biggest surprise to me, thyme.
I thought I would give squash soup another try with these ideas in mind. What I created was a delicious soup. While I used only acorn, this would be a great place to use different varieties of winter squash. I will definitely be making this again. Enjoy!

Fall Squash Soup

by Ace Nation
Keywords: soup/stew winter squash fall
Ingredients
  • 1-2 tablespoons olive oil
  • 2 tablespoons unsalted butter
  • 1 large onion or 2 small onions, diced
  • 4 garlic cloves, finely minced
  • 1 acorn squash, roasted and peeled
  • 3 cups water (or vegetable or chicken stock)
  • 1 cup half-and-half
  • 1 teaspoon dried thyme
  • 1/2-1 teaspoon kosher salt
  • Freshly ground black pepper, to taste
Instructions
In a soup pot, heat 1-2 tablespoons olive oil with 2 tablespoons butter over low to medium-low heat. Add onions, stirring occasionally, cook slowly until onions are very browned, about 25 minutes.
Add garlic and saute until cooked, about 5 minutes.
Add roasted squash, stock, thyme, salt, and pepper.
Bring to a boil, lower heat, and simmer about 15 minutes.
Very carefully blend until smooth. Return to a clean pot and add half-and-half. Heat to a gentle simmer. Serve and enjoy!
Powered by Recipage

Wednesday, November 6, 2013

Fall Squash Soup Teaser


Soup is one of the best and easiest ways to highlight winter squash. I've made acorn squash soup before but this is the best by far. Check back soon for the simple recipe to this delicious soup!

Sunday, November 3, 2013

Delicata Squash with Spicy Miso


Delicata squash won't be around for much longer so enjoy it while you still can! I love using delicata squash with strong flavors. Here are a couple of my own favorite recipes that use delicata squash:
Delicata is versatile because of its mild flavor and delicate texture, which combines the best of winter and summer squash. Hands down, the best way to highlight the flavor and texture of delicata squash is roasting. I love the squash cut fairly thickly with a little color.

I did a little research and first found a recipe for a Roasted Delicata Squash Salad from 101 Cookbooks. Making a salad from roasted vegetables? Why, yes, that is right up my culinary alley. Millet Salad with Orange Vinaigrette, perhaps? I think a lentil salad with roasted winter vegetables will be in near future. 

What caught my eye in the roasted delicata squash salad post was the mention of the inspiration of the recipe: delicata squash with spicy miso. I found Delicata Squash with Spicy Miso Butter from The Dinner Files. I love miso and I love harissa, both of which are quite at home in my refrigerator. I never would have thought of combining them! I have no other way to word to describe miso than with funky. Delicata squash is the perfect canvas for miso's funkiness balanced with harissa's fieriness. I added a few whole cloves of fresh garlic to my second creation of this recipe and loved it even more. Enjoy!

Roasted Delicata Squash with Miso and Harissa

by Ace Nation
Keywords: bake vegan delicata squash miso harissa
Ingredients
  • 2 tablespoons canola oil (more if needed to coat the squash)
  • 1 delicata squash
  • 1 tablespoon miso
  • 1-2 teaspoons harissa (more or less depending on taste)
  • Kosher salt,, to taste
Instructions
To prepare the squash, cut the ends off and cut length-wise down the middle. Scoop out all the seeds and membrane. Place cut-side down on a cutting board and cut into 1/2 inch slices.
Preheat oven to 350 degrees Fahrenheit.
In a large bowl, whisk together oil, miso, harissa, and salt until smooth (this will separate and the miso might have a grainy texture, this is normal).
Add squash to the oil-miso-harissa mixture. Toss until all the squash is coated on all sides with the oil.
Place in a single layer on a baking sheet. Bake about 10 minutes, then turn. Continue baking another 3-5 minutes, until the squash is tender but not overcooked.
Enjoy!
Powered by Recipage

Sunday, October 27, 2013

Pantry-Friendly Pie: Vegan Acorn Squash Pie with Crust


Since I made my first vegan acorn squash pie two years ago, I have been experimenting with different recipes and different squashes. I haven't posted any of them because they didn't turn out in taste or looks or both. This whole vegan baking thing is tricky.

My latest attempt at vegan pie even looks like a pie!
Today, I thought I would share my most recent experiment, my attempt at creating a pantry-friendly acorn squash pie. My biggest accomplishment was making a pie crust. I have an unreasonable aversion to making pie crust. I make the biggest mess when trying to roll out a pie crust and have a tendency to crack the crust. I found a tip: roll the crust between two sheets of wax paper. As long as both sheets of the wax paper are floured, this worked much better for me. I could easily move the crust around or flip it over. When the time came to place the crust in the pie pan, I used the invert method (see step 6) from the Pie Maven. I made sure to blind bake the crust before adding the filling.

Here is the recipe I used for the crust. Very simple and Grandma would approve.

 
I used my original vegan acorn squash pie recipe as the base of my recipe. After making several failed squash pies, one important lesson I have learned is to blend all the ingredients in the blender, especially if using fresh winter squash. My ingredients for this pie were:
 
I omitted the apples since I had a crust and I wanted to see what would happen without the cornstarch. Turns out, these kinds of pies need at least a bit of cornstarch or arrowroot powder to form the proper texture. I also made sure not to overcook the pie! Do you have a favorite recipe I should try? What are your suggestions???


Wednesday, October 23, 2013

Pumpkin Spice Blend


With all the ideas I have for upcoming recipes, finally making my own pumpkin pie spice blend seemed like a good idea. I've been pulling cinnamon, ground ginger, and nutmeg out of the cupboard every time I make a fall desert. In all the pumpkin pie recipes I have read there are always a bit of clove. I wondered if I was missing out on something. 

I don't particularly like cloves unless they are used to scent rice. Turns out, when combined with other spices, clove really does bring something to the party. If you're like me and have no intention of using clove again, I bought just enough for this recipe from the spice section.

I borrowed the Old Farmer's Almanac recipe (I left out the all spice for no other reason than I forgot to get some). I plan on adding the nutmeg when I use the spice blend so I can grate it fresh.

Why make your own pumpkin spice blend? The cheapest jar at the supermarket would have cost $2.99. We all have cinnamon in the cupboard. The ginger came from a jar that I bought at 40% off. Ground ginger can be used both in desserts and savory dishes so I thought that was a worthwhile investment. The cloves I bought a small amount from the bulk for about $0.50. Not such a bad deal!

Sunday, October 20, 2013

Ensalada de Repollo: Latin Cabbage Salad


I know next to nothing about Latin food and have been trying to change this. My journey started with ensalada de remolacha. A bright, refreshing salad of tender beets dressed with a citrus dressing. Then I moved on to piccadillo, which Z. and I have enjoyed over pasta and I have used the leftovers in several creative ways. The next recipe on my Latin food adventure was my take on migas.

Now I am on to ensalada de repollo. What do I like so much about this recipe?
  • It's cheap. Cabbage is the cheap/poor person's best friend.
  • All the vegetables are what I consider year-round veggies. Of course, this time of year, the cabbage is going to be particularly sweet and flavorful. 
  • There is room for variation. I added many different veggies but if you just want cabbage, carrots, and cilantro, then go for it. Just make sure you invite me over for dinner. Jalapeno vinaigrette doesn't sound appealing to you? Leave it out or use 1/2 jalapeno. The sharpness and spiciness from a spicy chile pepper isn't for everyone.
Enjoy!


Latin Cabbage Salad

by Ace Nation
Keywords: raw gluten-free vegan Cuban
Ingredients (serves 6-8)
    For the dressing
    • 1/2 cup vinegar, such as white vinegar
    • 1/2 cup water
    • 2 tablespoons olive oil
    • 1/2-1 whole jalapeno, seeds removed and chopped
    • 2 teaspoons Kosher salt, more or less depending on taste
    For the salad
    • 3/4 small head green cabbage, finely diced
    • 1/4 head purple cabbage, finely diced
    • 1 carrot, peeled and grated
    • 1/2 red onion, finely diced
    • 1/2 cup diced red pepper, such as red bell pepper, Italian sweet pepper, or New Mexico chile
    • 1/2 bunch cilantro, chopped
    Instructions
    Combine all the dressing ingredients in a blender and blend until smooth. Set aside.
    Try to cut the vegetables all the same size. Combine the vegetables and dressing in a large mixing bowl. Taste and add more salt if needed.
    May be served immediately but is best when refrigerated for at least 1 hour. This salad gets better and better with time.
    Serve as a side dish or as a condiment to a variety of meals, such as tacos or sandwiches.
    Enjoy!
    Powered by Recipage

    Wednesday, October 16, 2013

    Delicata Squash Idea


    I do love my involved, time-consuming recipes. There are times, when the best way to enjoy an ingredient is as simply as possible. I feel very silly. It's taken me three years of cooking with delicata squash to even try it simply roasted. Oven-roasted with a drizzle of olive oil, salt, and pepper is my favorite way to enjoy this seasonal favorite!

    To make:

    Preheat oven to 400 degrees Fahrenheit. In a mixing bowl, combine squash with enough olive oil to coat. Season liberally with salt and freshly ground black pepper. Roast about 10 minutes, then mix, turning the squash. Roast an additional 7-10 minutes, until the squash is tender. Enjoy!

    Sunday, October 13, 2013

    Quick Remake of Acorn Squash with Chickpeas


    Winter squash are beginning to appear in the markets! What's that mean for Cheap not Frugal Eats? Winter squash obsession begins! 

    I used my recipe Acorn Squash with Chickpeas and Adobo as inspiration for a quick dinner. I sauteed delicata squash that I then simmered in a spicy, peppery tomato sauce (Z.'s red sauce he made with New Mexico chilies) with chickpeas and a few spices. I served my squash and chickpeas over couscous. If you can measure and boil water, you can make couscous. 

    I sauteed 1 cup of delicata squash about 5 minutes in a large, high-sided pan. I then toasted 1/4 teaspoon turmeric, 1/2 teaspoon cumin, and 1 teaspoon smoked paprika for 30 seconds then added 1 cup tomato sauce and about 1/2 can of rinsed and drained chickpeas. I put a lid on the pan and let simmer about 15 minutes, stirring occasionally, until the squash was tender. Meanwhile, I prepared my couscous. This meal was spicy, flavorful, and just right for a dark, overcast evening. 

    What are your favorite leftover quick meal ideas?


    Wednesday, October 9, 2013

    Dessert for One: Pumpkin Pie for One


    I am genuinely proud of my pumpkin pie for one. What's so special about this pie?
    • Delicious! I love pumpkin pie of any variety, make, or model. There is truly something special about a homemade pie. 
    • Simple! People take their pie crusts seriously, for good reason. For most of us mortals, pie crusts are a pain. My solution anymore: pie without the crust!
    • This is a real pumpkin pie. Don't get me wrong, try my vegan acorn squash pie if you are avoiding eggs or dairy. It's delicious, too! This pie was creamy and custardy. In other words, just right.
    Here's a glimpse of the second! pie I made turned out of the pan.

    Why, yes, I did take one of the most traditional pie recipes in America and cut it in half. Enjoy!


    Pumpkin Pie for One

    by Ace Nation
    Keywords: bake dessert winter squash
    Ingredients (1 small pie)
    • 1/4-1/2 cup sugar (depending on your taste)
    • 1/4 teaspoon salt
    • 3/4 teaspoon pumpkin pie spice blend (or 1/2 teaspoon ground cinnamon, 1/4 teaspoon ginger, and 1/8 teaspoon ground nutmeg)
    • 1 teaspoon vanilla extract
    • 1 egg, lightly beaten
    • 1 cup pumpkin puree
    • 3/4 cup milk
    • Non-stick cooking spray
    Instructions
    Preheat oven to 425 degrees Fahrenheit.
    Spray a small pie pan or a 2-cup casserole dish with non-stick cooking spray.
    In a mixing bowl, stir all ingredients until well combined. Batter will be very thin.
    Pour into prepared baking dish. Bake at 425 degrees for 15 minutes. Reduce temperature to 350 degrees and bake 35-45 minutes longer, until a knife inserted into the middle comes out clean.
    Enjoy!
    Powered by Recipage

    Sunday, October 6, 2013

    Dessert for One: Traditional Pumpkin Pie Teaser

     
    Warning: The following statement just might be hipster-overload. Please don't leave me.

    I have had a package of pumpkin puree sitting in the freezer that I made myself from roasting an heirloom pumpkin which came from my local farmer's market.

    Look, it's so cute!

    I used the buttercup on the left for my pie. The pumpkin on the right is called a baby bear.


    I wanted to do something special for myself. What's more special than pie! I was craving a creamy, custardy, traditional pie but knew I would be the only person enjoying this pie. Boyfriend only enjoys pumpkin in beer form. So, I kept it simple. Come back later in the week for the recipe!

    Wednesday, September 25, 2013

    Recipe Review: Peperoni Ripieni con Tonno


    Source: Lidia Bastianich on Cookstr


    I have an abundance of sweet Italian peppers on hand. I've made plenty of pasta meals, scrambles, and stir-fries. I wanted to do something a little different with these once-a-year treats. 

    I came across this recipe from Lidia Bastianich and made half the recipe since it was just for myself. The ingredients are very simple and pantry-friendly:
    • peppers
    • olive oil
    • salt
    • tuna
    • capers
    • vinegar
    • mustard
    • mayonnaise
    • fresh herbs

    I made a few adjustments to suit what I had in my pantry. Instead of capers, I added green olives. I used to hate green olives; I still don't care for them on their own but green olives really do add a special briny touch. I had a few leaves of basil left so I used those, instead. These little rolls would make tasty appetizers but I had a plateful for dinner. Given them a try and enjoy!